📌 26 de Setembro, 2021
NanoPi M4: Python GPIO Tutorial
Recently I published an article explaining how to read and write to your NanoPi M4 or M4V2 digital pins from bash, now I’ll be doing the same from Python with the help of a few libraries.
In ARM systems such as the Raspberry Pi GPIO access in Python is usually done with the package RPi.GPIO but that won’t work with the NanoPi M4. Thankfully some folks implemented an alternative package called OPi.GPIO that was initially intended for the OrangePi but now also works the the Nano Pi M4 and NanoPi M4v2. We begin by installing python 3 and this package:
apt update
apt install python3 python3-pip
pip3 install OPi.GPIO
GPIO Output: Write Values
Now a simple code that will change the state of the physical pin 15 of the board, also known as GPIO1_A4:
#!/usr/bin/env python3
from time import sleep
import nanopi.m4
import OPi.GPIO as GPIO

# Specify what board we're using
GPIO.setmode(nanopi.m4.BOARD)
GPIO.setwarnings(False)

# Setup the pin as an output
pin = 15 # IN GPIO1_A4
GPIO.setup(pin, GPIO.OUT)

# Change the state
GPIO.output(pin, GPIO.HIGH)
sleep(5)
GPIO.output(pin, GPIO.LOW)
sleep(5)
The code above will set the pin as HIGH for 5 seconds and then to low again. If you connect a voltmeter between this pin and ground it will measure around 3v for 5 seconds.
GPIO Input: Read Values
In order to detect when a push button is pressed, we need to read the value of a GPIO. Let’s consider the following switch connected to GPIO1_C7:
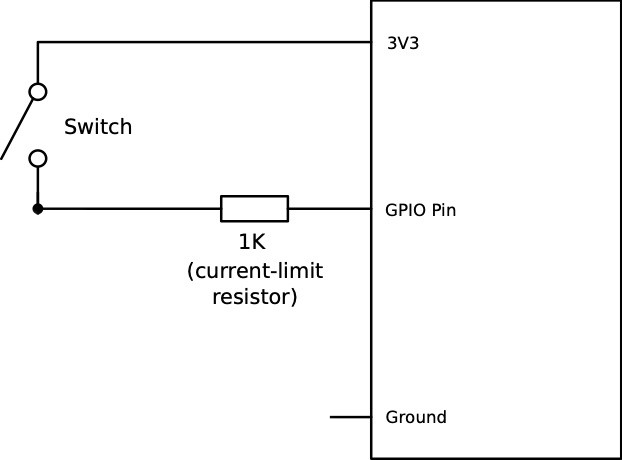
Our GPIO pin is connected to the 3v3 pin whenever the button is pressed causing a status change from LOW to HIGH. The 1k resistor is optional but recommend – it ensures that even if you mistakenly change the pin direction your NanoPi M4 won’t get fried. You may also use a higher value resistor such as 5k or 10k but bear in mind that the higher the value the slower the GPIO.
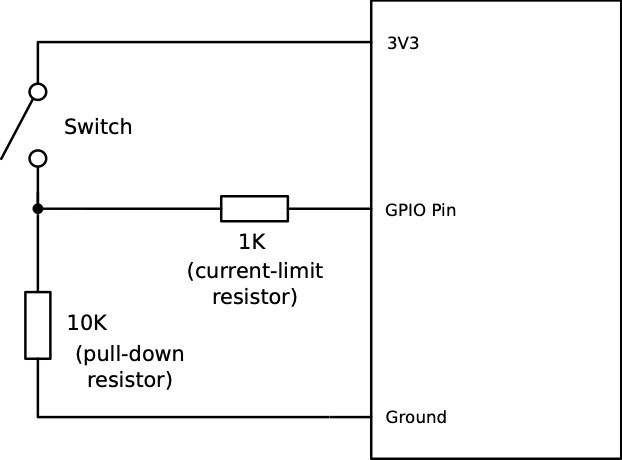
Note: In my experience the NanoPi M4 seems to conveniently use an internal pull-down resistor on GPIOs. This means we don’t need to add an extra resistor in order to have stable readings. If you get unstable readings you’ll need a circuit with an external pull-down:
Now an example on how to read the pin from Python:
#!/usr/bin/env python3
from time import sleep
import nanopi.m4
import OPi.GPIO as GPIO

# Specify what board we're using
GPIO.setmode(nanopi.m4.BOARD)
GPIO.setwarnings(False)

# Make sure the pin is set as an input and we're using the internal pull down resistor
GPIO.setup(pin, GPIO.IN, pull_up_down=GPIO.PUD_DOWN)

while True:
	if GPIO.input(pin):
		print('Input was HIGH')
	else:
		print('Input was LOW')
	sleep(1)
When the switch is pressed, we’ll get a message saying the GPIO state changed.
Although the code above works just fine we usually don’t want to have our program stuck in a loop waiting for a GPIO to change state. In order to avoid this situation we use what is called “edge detection”. This functionally takes advantage a low level mechanism called interrupt and whenever the state of the GPIO changes a function gets called. Here is an example:
#!/usr/bin/env python3
from time import sleep
import nanopi.m4
import OPi.GPIO as GPIO

# Specify what board we're using
GPIO.setmode(nanopi.m4.BOARD)
GPIO.setwarnings(False)

# Make sure the pin is set as an input and we're using the internal pull down resistor
GPIO.setup(pin, GPIO.IN, pull_up_down=GPIO.PUD_DOWN)

# The callback function
def event_callback(channel):
    print('Event detected: %s' % GPIO.input(pin))

# Setup edge detection
GPIO.add_event_detect(pin, GPIO.FALLING, callback=event_callback, bouncetime=1000)

while True:
    sleep(1)
As you can see our main code on the bottom is now free to do whatever we need.
Tip: don’t write very large callback functions. I usually use those function set variables signaling GPIO state changes and then the main loop will take action when appropriate. This avoids issues when a button is pressed multiple times very fast and/or the GPIO registers multiple times the same value.
Enjoy!