📌 13 de Junho, 2020
MacBook ’07 + Linux: Old Dog Learns New Tricks
Apple · Informática · Linux
I was looking for a cheap machine to run backups and weird experimental stuff and then I remember I had an old MacBook 3,1 from 2007 (Core 2 Duo 2.2 Ghz) in a shelve. In this post I’ll dig deep into useful tricks for anyone looking to use this laptop (or similar) as cli-only Debian server for fun and profit.
Why not use some modern ARM-based SBC (single board computer)? An SBC isn’t free and international shipping is very slow these days while my old MacBook was laying in a shelve.
What about power consumption? ARM devices are usually very power efficient but according to my watt metter my old MacBook uses 12W of power when running idle / light tasks so I’m not worried about power consumption. Also I might also leave it turned off most of the time and turn it on automatically at specific hours to run some tasks.
S-Video Error at Boot
You’ll quickly find out a boot time error about an allegedly S-Video output issue, this is an Intel GPU related bug. It will slow down your boot and usually takes this form:
[drm:drm_atomic_helper_commit_cleanup_done [drm_kms_helper]] *ERROR* [CRTC:26:pipe A] flip_done timed outFortunately there’s an easy fix, change your grub config at /etc/default/grub and add an extra kernel parameter:
GRUB_CMDLINE_LINUX_DEFAULT="quiet splash video=SVIDEO-1:d"Now update grub and reboot your machine:
update-grub
reboot
Interact With Apple’s EFI
It is possible to read values from Apple’s EFI NVRAM using efivar:
apt install efivar
efivar -l
efivar --print --name 8be4df61-93ca-11d2-aa0d-00e098032b8c-BootCurrent
Unfortunately you can’t shouldn’t write values back. According to most of the information available online writing values to the EFI from Linux usually results in a corrupted NVRAM and/or a broken machine.
Disable Useless Hardware
My use-case for this machine is cli-only Debian server mounted in a rack and accessed via SSH 99.99% of the time. With that in mind I don’t need the iSight Camera or Wireless networking, thus I should disable them. One may list what drivers / modules are loaded into the kernel with the following tools:
lspci -k
lsmod
lsmod | grep isight
The last command specifically searches for the iSight Camera and I found the module / driver to be identified as isight_firmware. Using the same approach I was able to find out that the AirPort Wireless Card is b43. Both modules can be blacklisted (disabled) by adding the following to /etc/modprobe.d/blacklist.conf:
blacklist b43
blacklist isight_firmware
Always Online I: No Bears Allowed
My “server” should always be online, it should not **ever** sleep, suspend or hibernate be it via power management, an accidental button press or by closing the lid. Luckily dealing with this issue is as simple as modifying /etc/systemd/logind.conf to look like:
HandlePowerKey=ignore
HandleSuspendKey=ignore
HandleHibernateKey=ignore
HandleLidSwitch=ignore
HandleLidSwitchExternalPower=ignore
HandleLidSwitchDocked=ignore
(...)
IdleAction=ignore
There you have it, systemd saved the day again.
Always Online II: I Shall Come Back!
In the event of a power failure or any accidental shutdown I found out that I can use the built in RTC (real time clock) to make sure the computer is almost always on. Neat trick isn’t it?
You may set the computer to wake at a specific time or in some minutes:
rtcwake --mode no --local --time $(date +\%s -d '2020-06-13 22:45') # turns on / wakes up the computer at a specific time
rtcwake --date +10min # turns on / wakes up the computer after xyz minutes
Now the tricky part: we can ask systemd to update the RTC regularly in order to make sure that in case of a power failure the computer will turn itself on, eventually:
vim /etc/systemd/system/rtc-force-on.service

[Unit]
Description=RTC Force Always ON

[Install]
WantedBy=multi-user.target

[Service]
Type=oneshot
User=root
Group=root

# - at ExecStart ignores the error exit code of rtcwake in Apple hardware
ExecStart=-/usr/sbin/rtcwake --date +360min
vim /etc/systemd/system/rtc-force-on.timer
[Unit]
Description=RTC Force Always ON
[Install]
WantedBy=timers.target
[Timer]
OnBootSec=5min
OnCalendar=0/6:00:00
Persistent=falseYou may enable and start both with:
systemctl enable rtc-force-on.timer
systemctl enable rtc-force-on.service
systemctl start rtc-force-on.timer
systemctl start rtc-force-on.service
The timer is set to run at boot and then at every 6 hours. The service writes current time + 6 hours to the RTC in order to force the computer to turn on automatically if the power goes out. If the power is out when the timestamp is reached the computer will still turn on when the power comes back.
Why not set this to run every minute? I suspect there is a limit on how many times you can write to the RTC before breaking it… small and cheap memory like this isn’t made for frequent writes thus six hours should be reasonable. macOS system preferences also allow you to start up the computer ever day at the same time:
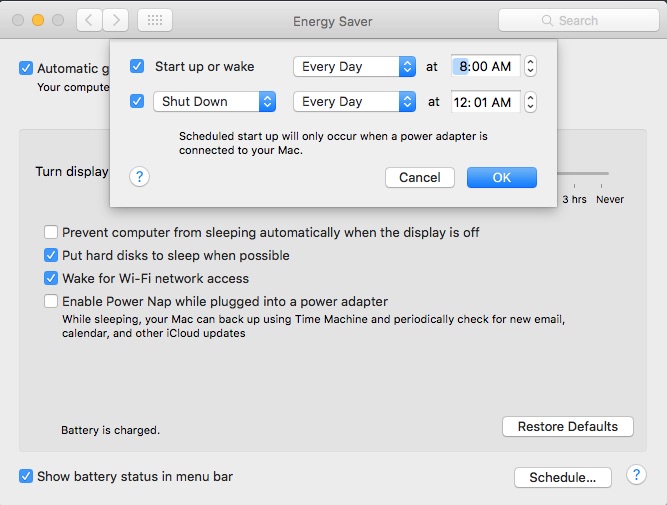
After further investigation I concluded macOS also uses the same trick – it updates the RTC timestamp at boot or whenever it reaches the start up time.
You may check if any timestamp was written to the RTC with cat /sys/class/rtc/rtc0/wakealarm or reset it with rtcwake -m disable. Note: writing to the RTC on Apple computers using rtcwake usually results in a error, ignore it, it still works.
Manage Screen Brightness & Power
I’m using the computer without a GUI and I don’t need the screen always on wasting power. You may check the current brightness level of the screen, turn it off / on with:
cat /sys/class/backlight/intel_backlight/actual_brightness
echo 0 > /sys/class/backlight/intel_backlight/brightness
cat /sys/class/backlight/intel_backlight/max_brightness > /sys/class/backlight/intel_backlight/brightness
In most computers vbetool dpms off would be preferable but it doesn’t work in this MacBook. Setting the brightness to zero will turn off the screen (I’ve tested this with a watt meter hooked to the computer). I also wrote the following systemd service to turn off the screen at every boot:
vim /etc/systemd/system/backlight-watch.service

[Unit]
Description=Backlight Watch

[Install]
WantedBy=multi-user.target

[Service]
Type=oneshot
User=root
Group=root

ExecStart=/bin/bash /mnt/HDD1/scripts/backlight-watch.sh
Now what about if I have an emergency and I need to use the built in screen? I tried to turn on the screen with a key press and turn if off after some minutes of inactivity, but unfortunately, it doesn’t seem easy to accomplish this without X/GUI. If you’ve a solution email me.
My next solution was to create two udev rules to make it so if I connect an old USB flash drive to the computer it will turn on the screen:
vim /etc/udev/rules.d/99-lid.rules

ACTION=="add", ATTRS{serial}=="XXXXXXYYYYYZZZZ", RUN+="/bin/su root --command='echo 400 > /sys/class/backlight/intel_backlight/brightness'"
ACTION=="remove", ATTRS{serial}=="XXXXXXYYYYYZZZZ", RUN+="/bin/su root --command='echo 0 > /sys/class/backlight/intel_backlight/brightness"
ATTRS{serial}=="XXXXXXYYYYYZZZZ" is the serial number of my USB flash drive. You may find yours with udevadm info -a /dev/sdb | grep serial.
Do you remember backlight-watch.sh from the service above? We can make it so it won’t turn off the screen if the USB flash drive is connected as well:
#!/bin/bash

USB_SN="XXXXXXYYYYYZZZZ" # Your USB Flash Drive Serial Number

STATUS=$(cat /sys/class/backlight/intel_backlight/actual_brightness)
if [[ "$STATUS" == 0 ]]; then
        echo "Screen already off."
        exit
fi

if usb-devices | grep -q "SerialNumber=$USB_SN"; then
   echo "Screen ON, fallback USB device connected."
   exit
fi

echo "Screen is ON! Turning off..."
echo 0 > /sys/class/backlight/intel_backlight/brightness
This solution isn’t the most elegant however it easy to implement and very reliable. Now you can enable your systemd backlight management service with:
systemctl enable backlight-watch.service
systemctl start backlight-watch.service
Keeping it Cool
It’s well known that this particular model all Apple laptops sometimes frequently run close to CPU melting temperatures. You may get temperature readings from the built in sensors with:
apt install lm-sensors
sensors-detect
sensors
It’s also possible to manually control the speed to the fan as follows:
# Set fan control to manual mode
echo 1 > /sys/devices/platform/applesmc.768/fan1_manual

# View the fan speed limits
cat /sys/devices/platform/applesmc.768/fan1_min
cat /sys/devices/platform/applesmc.768/fan1_max

# Set the fan to it's max by writing to fan1_output
cat /sys/devices/platform/applesmc.768/fan1_max > /sys/devices/platform/applesmc.768/fan1_output

# To reverse back to automatic management
echo 0 > /sys/devices/platform/applesmc.768/fan1_manual
As excepted you may also monitor your CPU clock speed by using cpufreq-info. This is usually useful to debug CPU governor upscaling and downscaling issues that might result in high temperatures and in unreasonable power usable.
No more tricks today! I hope this post was useful for your Apple computer recycling endeavors.